Are you finding yourself in discomfort during and after your bike rides?
Do you experience nagging pains in your saddle area, knees, or feel unnecessary strain in your neck, shoulders, and wrists?
If you do, you’ve landed in the right spot because, in this post, we’ll dive into the essential bike fitting tips and adjustments you can take on yourself so you can swap these cycling niggles and pains for a more enjoyable and pain-free cycling experience.
Let’s get started.

Whether you’re a runner looking for running tips or a cyclist searching for cycling advice, this site is here to help you elevate your fitness game.
Affiliate Disclosure: I’m here to help you grow as a rider and runner. So to keep things running smoothly and the content free, I participate in the Amazon Services program and select affiliate networks. So, when you click on those affiliate links, I earn a small commission at no extra cost to you.
Why you should have a proper bike fit
Getting a bike fit is the magic ingredient that impacts your comfort, performance, and overall cycling enjoyment.
A bike fit is like stepping into a tailor’s shop. Just as a tailor customizes your clothes to fit your unique body shape, a proper bike fit tailors your bicycle to suit your individual body and riding style.
Imagine going to a tailor with a ready-made suit.
The tailor takes precise measurements, considering your body proportions, posture, and preferences. They then make adjustments to the suit—such as hemming the pant legs and shortening the sleeves—to ensure it fits you like a glove. The goal is to enhance your comfort, allowing you to move freely and confidently.
Similarly, during a proper bike fit, a professional (or if you take a DIY route, you) takes measurements and evaluates your body dimensions, flexibility, and riding preferences.
They (or you) will make bike fit adjustments to the bike, such as saddle height, handlebar position, and cleat alignment, to create a personalized setup.
This tailored bike fit optimizes your comfort, efficiency, and performance on the bike.
Just as a tailored suit enhances your appearance and confidence, a proper bike fit boosts your comfort, prevents common cycling injuries, improves your performance, and ultimately, your enjoyment—whether you’re cycling alone or with friends.
And a friendly reminder: your bike fit is not a one-and-done deal.
Just like life, things change and evolve.
So, as your fitness level, flexibility, or riding goals shift, don’t forget to reassess your bike fit. Regular check-ins will ensure your bike still meets your needs to give you the best cycling experience possible.
SHOULD YOU DO A PROFESSIONAL BIKE FIT OR DIY?
Let’s tackle whether to go pro or take the DIY route for your bike fit. It’s like choosing between having a cycling coach or sweating it out on your own.
Both options have their perks, so let’s dig a little deeper.
Professional bike fit. When you opt for a professional road bike fit, you’re tapping into a treasure trove of knowledge.
A pro bike fitter has specialized training in biomechanics, anatomy, and the science of bike fitting. Because of their deep knowledge of how your body interacts with the bike, they’ll fine-tune every aspect of your bike to cater to your preferences and riding style.
DIY bike fit. You’re in charge here, and you’ll save some money by checking your body alignment and position on the bike.
Doing your bike fit is an opportunity to learn more about your biomechanics, riding style, and preferences. And if you need to tweak something in the future? You’ll know exactly how to fit a bike.
But there’s a catch. Without the trained eye of a professional, you might miss some subtle imbalances or misalignments that could impact your comfort on the bike.
Whether you choose to consult the pros or strike out on your own, it ultimately depends on your appetite for knowledge and the time you’re willing to invest.
Are you eager to delve deep into the intricacies of your body and bike? Are you curious about bike fitting? Or would you prefer a quicker solution that allows you to hit the road sooner?
HOW TO FIT A BIKE: FINDING YOUR PERFECT RIDING POSITION
Determine how you want to feel on your road bike
Remember, a road bike fit takes into account your body dimensions, flexibility, and riding preferences.
You’ll make adjustments to the bike’s components, such as saddle height and handlebar position to create a personalized setup. This tailored road bike fit optimizes your comfort, efficiency, and performance on the bike.
So let’s find the perfect road bike position for you. With road bikes, you have three fit options to choose from:
- Aggressive/ race bike fit: Maximize aerodynamics and chase podium finishes with this fit. Pro racers and time trialists choose this road bike fit because the handlebars are lower for an extra aerodynamic edge.
- Endurance/ comfort bike fit: This is the road bike fit for you if you want to enjoy the open road or ride a century without sacrificing comfort. The handles are higher than a race fit, allowing you to hold a relaxed upright riding position.
- Balanced/ performance fit: This road bike fit position balances aerodynamics and comfort. You’ll have a moderate lean forward, so it’s a versatile position if you want to do a little bit of everything.
BIKE FITTING TIPS: ROAD BIKE FIT ADJUSTMENTS
How to adjust your bike seat height, also known as the saddle height
Let’s talk about how to fit a bike, starting with your bike seat height, which is also known as saddle height.
Before we begin, let’s make sure we have the right tools by our side.
You’ll need a trusty multitool or hex wrench. And if you’re the proud owner of a carbon bike, don’t forget to grab a torque wrench for extra precision.
Now let’s turn our attention to the seat post.
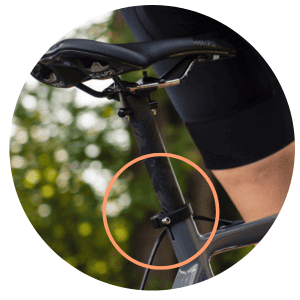
Do you see a clamp securing the post to your bike? It’s time to put that multitool to work and loosen that clamp for those bike seat height adjustments.
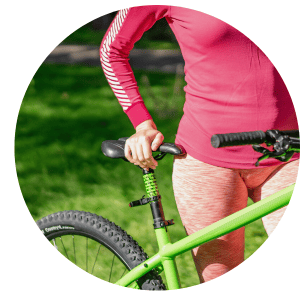
Step 1: Let’s start with a road bike seat position baseline. Stand next to your bike and move the seat post so the saddle is level with your hip bone.
Step 2: Pop your bike on an indoor trainer and pedal until your right foot is at the bottom of your pedal stroke, at the 6 o’clock.

Can you straighten your leg when the ball of your foot is on the pedal? If reaching your pedals feels like a stretch, lower your saddle. But if you can’t fully extend your leg, raise the saddle.
Sportneer Fluid Indoor Bike Trainer Stand
- Enjoy quiet and smooth spinning with premium resistance, banishing noisy workouts once and for all.
- Heavy-duty stainless steel frame for exceptional durability.
- Experience stability at its finest, thanks to the dual locking system and an extra-wide frame that eliminates any wobbling.
- Setup is a breeze – no extra tools required, making it perfect for an impromptu sweat session.
- When you’re done, fold the frame into a compact 24″ x 7.9″ x 25.2″ size for easy storage and on-the-go workouts.
Step 3: If you’ve stopped pedaling with your right foot at the bottom of your pedal stroke, take a peek at your left knee.
Ideally, it should be right over or slightly behind the ball of your foot.
If it’s far forward, you might need to lower your road bike seat position.
If your knee is behind the ball of your foot, your road bike seat position may be too high.
Step 4: Time to fine-tune your bike seat height. You’ll want to make micro-adjustments to get it just right.
If your bike seat height is a tad too high, lower it in 1 to 2 mm increments. On the flip side, if you feel like you need more height, raise your saddle in 1 to 2-mm increments. Hop back on the bike and pedal away, making sure to check your knee position with each tweak.
Step 5: Let’s hit the road and take your bike for a spin. How does it feel? If you’re feeling some niggles, keep making those mini adjustments until you find your ideal bike seat height.
HOW TO ADJUST YOUR HANDLEBARS
There are two things to consider when you turn your attention to your handlebars: the road bike handlebar height and handlebar reach.
How to find the right road bike handlebar height
Lowering your handlebars will lower your center of gravity and increase your traction.
You’ll feel like you’re hugging the road with your bike, gaining better control, especially when you’re tackling steep climbs.
Your riding style will probably drive your handlebar preference.
The pros often rock a significant drop, with handlebars positioned below the saddle for a streamlined, aerodynamic position.
And for those of us who aren’t pros? Many of us like to set our road bike handlebar height level to the saddle or slightly above the saddle.
Let’s get to adjusting your road bike handlebar height. You’ll adjust the height of your handlebars via the stem.
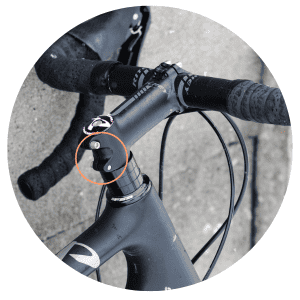
Step 1: Start by loosening the clamp bolts on the backside of the stem.
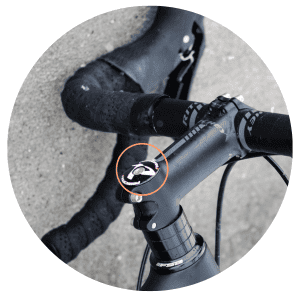
Step 2: Remove the top cap on top of the stem and slide the stem off the tube.
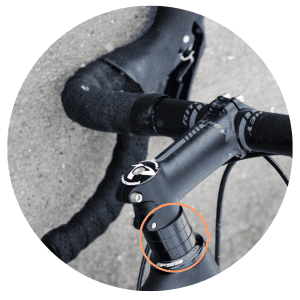
Step 3: Add or remove spacers to find your ideal handlebar height.
Step 4: Slide the stem back on and replace the spacers above it (if any).
Step 5: Tighten the top cap

Step 6: Align the stem with your front wheel

Step 7: Tighten the bolts at the backside of the stem.

How to refine your road bike handlebar position even more with handlebar reach
Handlebar reach is about how far you have to stretch your arms to reach those handlebars with ease.
Your balance and stability on the bike depend on getting that road bike handlebar position just right.
Handlebar reach varies from person to person and it all comes down to your unique body measurements, limb length, and flexibility.
Let’s take a closer look at what you can do to refine your road bike handlebar position.
Adjust your stem angle: Consider yourself lucky if you have a stem that allows you to play with angles. Loosen those faceplate bolts on the stem and give your handlebars a gentle nudge either up or down. Keep making those tiny adjustments until you find the angle that feels right for you.
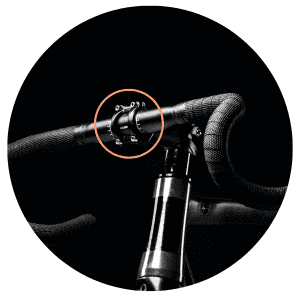
Try a different stem length: Stems come in various lengths, and if your current reach isn’t hitting the mark, it’s time to mix things up. Try a shorter stem to bring your handlebars closer or a longer stem to extend them further away.
REASSESS YOUR BIKE FIT
Remember, your bike fit is an ever-evolving journey.
Your fitness level, flexibility, and riding goals may shift over time, so you must reassess your bike fit as you change. By regularly checking in and adjusting your bike fit, you’ll ensure that your bike fit meets your current needs.
We’ve covered some bike fitting tips here and the cycling tips continue with this free pre-ride checklist to make sure you don’t miss a thing before your ride. Grab it now!
